
GENERAL
Aluminum Joists: The Future of Durable and Sustainable Decking

If you’re planning to build a new deck or revamp an existing one, you’ve probably been faced with a crucial decision: what kind of joists should you use? Traditionally, wood has been the go-to material, but in recent years, aluminum joist have been gaining serious popularity. And for good reason! Aluminum joists offer unmatched durability, sustainability, and versatility, making them a game-changer for outdoor construction.
In this blog post, we’ll dive into everything you need to know about aluminum joists, why they’re a superior option for decking, and how they compare to traditional wood joists. Whether you’re a DIY enthusiast or a seasoned contractor, you’ll walk away with a clear understanding of why aluminum joists might just be the perfect solution for your next project.
What Are Aluminum Joist?
An aluminum joist is a structural support beam made from aluminum, typically used in the construction of decks, patios, and other outdoor platforms. Joists are crucial to any structure’s stability because they support the weight of the deck boards and anything placed on top of them.
Aluminum joists are an alternative to traditional wood or steel joists and offer distinct advantages when it comes to longevity, weight, and resistance to environmental factors like moisture, rust, and warping.
Why Aluminum Joists Are a Superior Choice for Decking
With so many materials available, why choose aluminum joists? Here’s a breakdown of the key advantages aluminum has over traditional wood and even steel joists:
Durability
Unlike wood, which can rot, warp, or be eaten by pests, aluminum joists are highly resistant to environmental factors. They won’t swell or crack when exposed to moisture, and they’re immune to termites and other insects. This makes aluminum an ideal choice for outdoor projects, especially in areas prone to humidity, rain, or extreme temperatures.
Lightweight Yet Strong
Aluminum is incredibly strong relative to its weight. This means that you can get the same (or better) structural support as wood or steel, but with a much lighter material. This makes aluminum joists easier to handle, transport, and install, saving you time and effort during construction.
Rust and Corrosion Resistance
One of the major benefits of using aluminum is its resistance to rust and corrosion. Steel joists, while strong, are prone to rusting over time, especially in coastal areas where salty air accelerates corrosion. Aluminum joists, on the other hand, naturally resist rust, even in marine environments. This ensures a longer lifespan and lower maintenance costs.
Sustainability and Eco-Friendliness
Aluminum is one of the most recyclable materials in the world, and using it in construction is a sustainable choice. Aluminum joists can be fully recycled at the end of their lifecycle, reducing the environmental impact of your decking project. Additionally, since aluminum doesn’t need to be treated with chemicals to resist decay (as wood does), it’s a safer and more environmentally friendly option.
Long-Term Cost Savings
While aluminum joists may have a higher upfront cost than wood, they can save you money in the long run. Aluminum joists require little to no maintenance, won’t need to be replaced due to rot or pests, and last significantly longer. Over time, these factors make aluminum a cost-effective solution.
Aluminum Joists vs. Wood Joist: A Detailed Comparison
Let’s break down how aluminum joists stack up against their more traditional wood counterparts across a few key metrics:
Longevity
- Wood: Prone to rot, termite damage, and warping. Even treated wood may need replacement within 10-15 years, depending on environmental exposure.
- Aluminum: Highly durable, resistant to rot, pests, and environmental damage. Aluminum joists can last upwards of 30-50 years, offering double or even triple the lifespan of wood.
Maintenance
- Wood: Requires regular treatments, sealing, and inspections for rot or pests.
- Aluminum: Virtually maintenance-free. No sealing, painting, or treating required.
Environmental Impact
- Wood: The use of chemically treated lumber can have environmental consequences. Plus, deforestation concerns add to the material’s environmental footprint.
- Aluminum: Fully recyclable and free of chemical treatments, making it a more eco-friendly option.
Structural Integrity
- Wood: Strong but can weaken over time due to environmental factors. Wood can warp, twist, and crack under heavy loads or after years of exposure to moisture.
- Aluminum: Consistently strong over time. Doesn’t warp, crack, or lose its structural integrity, even in harsh conditions.
Cost
- Wood: Less expensive upfront but requires more maintenance and likely replacement down the line.
- Aluminum: Higher initial cost but leads to long-term savings due to its durability and low maintenance.
Unique Benefits of Aluminum Joist That Competitors Don’t Mention
When comparing existing blog posts on the topic, we found that many overlook some of the unique advantages aluminum joists offer. Here are some benefits you might not have considered:
Thermal Properties
Aluminum has a high thermal conductivity, meaning it heats up and cools down quickly. This makes it less prone to expansion and contraction from temperature changes compared to wood. In areas with extreme temperature shifts, aluminum joists help keep your deck stable without the risk of warping or splitting.
Fire Resistance
Unlike wood, which is highly flammable, aluminum is fire-resistant. In areas prone to wildfires or where fire safety is a concern, using aluminum joists can add an extra layer of protection to your deck.
Customizability
Aluminum joists can easily be cut to size, and many manufacturers offer customized joist systems that can be tailored to specific project needs. This level of flexibility is harder to achieve with traditional materials like wood or steel.
Common Applications of Aluminum Joist
Aluminum joists aren’t just limited to residential decking. Thanks to their durability and versatility, they can be used in a wide range of outdoor and indoor projects, including:
- Commercial Decks: Aluminum joists are increasingly being used for commercial projects where longevity and low maintenance are priorities.
- Patios and Balconies: Due to their lightweight properties, aluminum joists are perfect for elevated structures like balconies and terraces, where load-bearing concerns are paramount.
- Walkways and Boardwalks: In areas exposed to the elements, such as coastal boardwalks or garden walkways, aluminum joists provide the necessary durability to withstand harsh weather conditions.
- Roof Decking: Aluminum joists are ideal for rooftop decks where minimizing weight is important to avoid overloading the structure.
How to Install Aluminum Joist: A Quick Guide
Installing aluminum joists is surprisingly simple and follows many of the same steps as installing wood or steel joists. Here’s a general overview of the process:
- Measure and Plan: Lay out the area and plan your joist spacing. Aluminum joists can be spaced similar to wood joists, typically 16-24 inches apart depending on your decking material.
- Cut the Joists: Aluminum joists are easily cut to size using a standard saw with an appropriate blade. Always measure twice and cut once to ensure accuracy.
- Install Joist Hangers: Attach joist hangers or brackets to the ledger board or beams where the joists will be placed. This ensures a secure attachment for each joist.
- Attach the Joists: Secure the aluminum joists in place, ensuring they’re level and evenly spaced.
- Lay the Deck Boards: Once the joists are secured, you can begin laying your decking material. Aluminum joists work well with a variety of decking options, including wood, composite, or even metal deck boards.
Conclusion:
If you’re looking for a decking solution that’s durable, eco-friendly, and virtually maintenance-free, aluminum joists are hard to beat. They offer superior longevity, resistance to environmental damage, and long-term cost savings compared to traditional wood joists. Whether you’re building a backyard deck or a large commercial structure, aluminum joists are a smart investment that will stand the test of time.
FAQs
1. How long do aluminum joist last?
Aluminum joists can last 30-50 years or more, making them one of the most durable options for decking projects.
2. Are aluminum joist more expensive than wood?
Yes, aluminum joists have a higher upfront cost, but they offer significant long-term savings due to their durability and low maintenance.
3. Can aluminum joist be used in coastal areas?
Absolutely! Aluminum joists are highly resistant to rust and corrosion, making them ideal for use in marine and coastal environments.
4. Are aluminum joist recyclable?
Yes, aluminum is fully recyclable, making it an eco-friendly choice for decking and construction projects.
5. Can I install aluminum joist myself?
Yes, aluminum joists can be installed using standard tools, and the installation process is similar to that of wood or steel joists. However, it’s always recommended to consult a professional if you’re unsure.

The word “Licotes” might sound like a mystery, but it’s actually a term with intriguing uses across a few different contexts. You may have come across it while exploring wines, trying your hand at word games, or even in conversations about French culture. What exactly does “licotes” mean? Why is it popping up in these places?
What Does “Licotes” Mean?
The term “licotes” actually varies in meaning depending on the context. Here’s a quick overview of some of its most popular applications:
Wine Terminology: In the wine world, particularly in France, “Les Licotes” is a term associated with a specific variety of wine from the Villargeau winery in the Loire Valley. These wines are known for their light, refreshing qualities and are favored for their unique terroir.
Word Game and Linguistic Value: “Licotes” is also used as a scrabble term or word puzzle entry, sometimes attracting players who want to test its value in point-based word games.
Cultural Reference: In some regional settings, “Licotes” holds traditional significance, especially in parts of France where local wineries cultivate and name wines as part of their heritage.
Each of these meanings adds depth to the term, making “licotes” a versatile word with various applications, from sipping wine to racking up points in word games.
Exploring Les Licotes Wine: A French Favorite
Tasting Notes and Characteristics
Les Licotes wines are known for their light, aromatic profiles that make them popular for casual enjoyment and food pairing. Here’s what you can expect from a glass of Les Licotes:
Aroma: Fresh notes of citrus, like lemon and lime, with hints of green apple and occasionally floral undertones.
Taste: Crisp and refreshing on the palate, with bright acidity and a smooth, mineral finish, typical of the Loire Valley’s soil.
Mouthfeel: Light-bodied and easy-drinking, which makes it an excellent choice for warmer weather or lighter meals.
Why Les Licotes is a Must-Try
The unique terroir of the Loire Valley is captured in every sip of Les Licotes. The soils, a mix of clay and limestone, lend a natural minerality that balances the wine’s fruity elements.
How to Enjoy Les Licotes Wine
Whether you’re a wine aficionado or just starting out, here are some tips to make the most of a Les Licotes wine experience:
Serve at the Right Temperature: Les Licotes tastes best when served chilled, around 8-10°C (46-50°F).
Pairing Suggestions: This wine’s acidity and light body make it versatile. Pair it with seafood, grilled vegetables, fresh cheeses, or even sushi to highlight its citrus and mineral notes.
Consider the Setting: Les Licotes is a relaxed, social wine—perfect for picnics, outdoor gatherings, or as an aperitif before a meal. Its lightness means it won’t overpower conversations or heavier dishes.
Licotes in Language and Word Games
Word Puzzle and Scrabble Fun
In the world of word games, “licotes” has some appeal as a playable term, especially in Scrabble or Words with Friends, where high-value letters and word length can yield significant points. Players may use “licotes” strategically to maximize their score, taking advantage of the points associated with letters like “c” and “s.”
Scrabble Point Value of “Licotes”
Using “licotes” can net a respectable amount of points in Scrabble. Here’s a breakdown based on Scrabble’s scoring system:
Adding up to a total of 9 points, “licotes” might not be the highest-scoring word, but its flexibility in gameplay can help players get out of tough spots.
The Cultural Significance of Licotes
Licotes, particularly in the context of French wine culture, holds a special place. In France, wine is often a point of pride and tradition, with many regions producing wines that reflect local heritage and values. Les Licotes from Villargeau is no exception, representing the quality and care associated with French winemaking.
For those who enjoy wine, discovering Les Licote is more than just tasting a new bottle; it’s connecting with the Loire Valley’s history and the Villargeau family’s passion for their craft. This cultural connection brings a deeper level of appreciation and makes enjoying Les Licotes more meaningful.
Where to Find Les Licotes Wine
Interested in trying Les Licotes for yourself? Here are a few ways to locate a bottle:
Local Wine Shops: Specialty wine shops often carry French wines, including selections from the Loire Valley. Check with a nearby store, or ask them to order it if they don’t already stock it.
Online Wine Retailers: Many online platforms offer French wines, and you can easily find Les Licotes on popular wine retail sites. Be sure to check customer reviews to ensure authenticity.
Wine Tasting Events: Sometimes, local wineries or wine clubs host tastings featuring imported wines. Attend a tasting or join a wine club for a chance to sample Les Licote along with other wines from the Loire Valley.
Restaurants with French Menus: Some French restaurants offer carefully selected wine lists featuring Loire Valley wines. Ask if Les Licote or a similar wine is available.
Conclusion:
From its roots in French wine culture to its use in word games and linguistic exploration, “licote” is a term with surprising depth and versatility. Whether you’re sampling a glass of Les Licote from Villargeau or scoring points in a word game, licote has something to offer. It’s a term that bridges different interests, from wine enthusiasts to casual gamers, and serves as a reminder of the small things that bring richness to our lives.
FAQs
What is “Licote”?
- “Licote” has multiple meanings depending on context. It can refer to a French wine, specifically Les Licote from Villargeau, or be used in word games like Scrabble for scoring points.
How do you serve Les Licote wine?
- Les Licote is best served chilled at around 8-10°C (46-50°F). It pairs well with seafood, fresh salads, and light cheeses.
What does Les Licote wine taste like?
- Les Licote wine is light and refreshing with citrus and green apple notes, complemented by a crisp acidity and mineral finish.
Can you play “licote” in Scrabble?
- Yes, licote is playable in Scrabble, where it can earn you a moderate number of points based on letter values.
Where can I buy Les Licote wine?
- You can find Les Licote at specialty wine shops, online wine retailers, and certain French restaurants with curated wine selections.
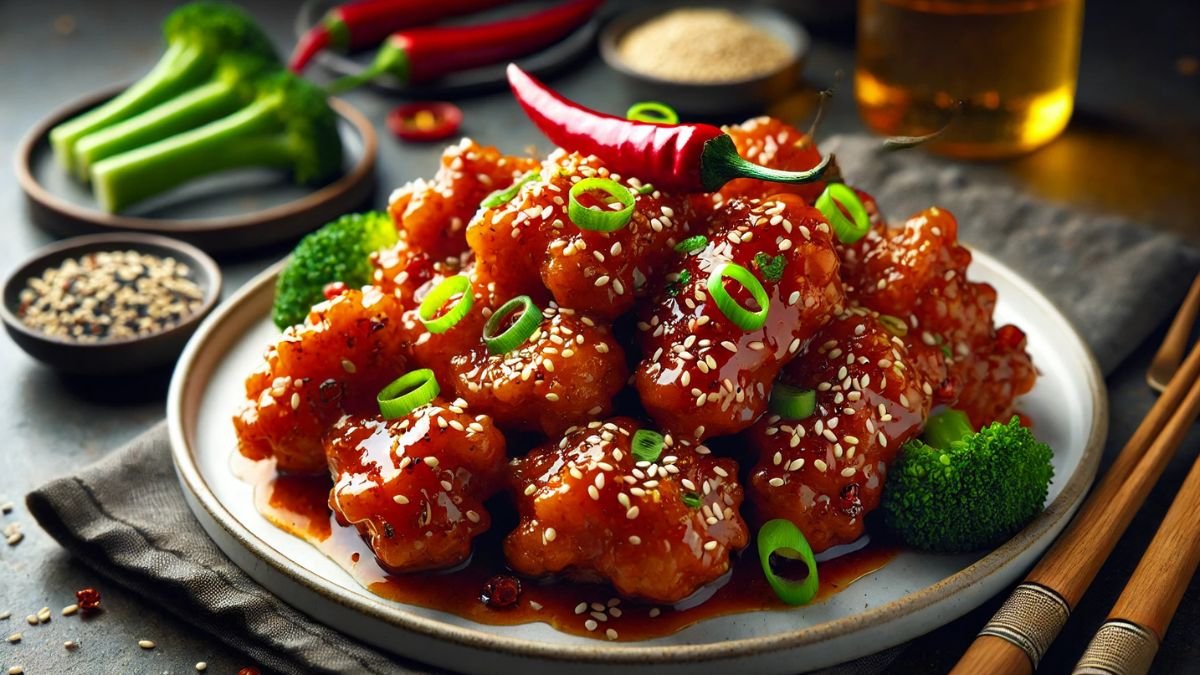
General Tso Chicken is a dish that’s both deliciously sweet and savory, with a hint of spice and an irresistibly crispy coating. It’s become a staple on Chinese restaurant menus in America, but many wonder where it actually came from, why it’s so beloved, and how to recreate it at home. In this guide, we’ll dive into the history, ingredients, and secrets to making authentic General Tso’s Chicken that can rival your favorite takeout spot. Ready to explore this iconic dish?
What is General Tso Chicken?
General Tso’s Chicken is a classic Chinese-American dish featuring battered and fried chicken pieces tossed in a tangy, sweet, and spicy sauce. It’s traditionally made with bite-sized chunks of chicken, fried to crispy perfection, and then coated in a sticky, flavorful sauce made from soy sauce, vinegar, sugar, garlic, and a hint of chili for spice.
The Fascinating History Behind General Tso Chicken
Interestingly, General Tso’s Chicken isn’t originally from China—at least not in the way we know it today. Named after General Tso Tsung-t’ang, a 19th-century Chinese military leader, the dish itself doesn’t have any verified connection to the general. The origins of the dish as we know it are often credited to Chinese-American chefs in the 1970s who wanted to introduce something bold and memorable to American taste buds. It’s believed that Chef Peng Chang-kuei, a chef from the Hunan Province of China, first created the dish in Taiwan, but it became popular in the United States through his restaurants in New York City.
The dish’s flavors are inspired by Hunan cuisine, which is known for its bold flavors and spicy elements, but General Tso’s Chicken has since become an Americanized version that’s typically milder and sweeter than traditional Chinese Hunan fare.
What Makes General Tso Chicken So Popular?
The success of General Tso’s Chicken lies in its balance of flavors and textures, which cater perfectly to American tastes. Here’s why it’s so beloved:
Sweet, Savory, and Spicy Sauce: The sauce perfectly combines sweet, savory, and spicy notes, creating a flavor that’s complex yet highly enjoyable.
Crispy Texture: Each piece of chicken is coated in a light batter that’s fried until crispy, providing a satisfying crunch with every bite.
Comfort Food Appeal: It’s a familiar, comforting dish with an indulgent feel, making it a popular choice for takeout nights or celebrations.
Ingredients You’ll Need for Authentic General Tso’s Chicken
One of the keys to creating the perfect General Tso’s Chicken is using fresh, flavorful ingredients. Here’s a breakdown of the essential components:
For the Chicken Marinade and Coating
Chicken Thighs: Thighs are preferred for their juiciness and tenderness, but chicken breast works as well.Soy Sauce: Adds depth and saltiness to the chicken.
Egg: Helps bind the coating to the chicken.
Cornstarch and Flour: This mixture creates the perfect crispy coating when fried.
For the Sauce
Soy Sauce: The base of the sauce, adding umami flavor.
Rice Vinegar: Provides a tangy kick and balances the sweetness.
Hoison Sauce: Adds a rich, slightly sweet flavor.
Sugar: Brown or white sugar balances out the savory elements with sweetness.
Garlic and Ginger: Aromatic ingredients that add warmth and depth to the sauce.
Dried Red Chilies: These give the sauce a bit of heat, but you can adjust the amount to taste.
Step-by-Step Guide to Making General Tso’s Chicken
Creating this dish from scratch might seem intimidating, but breaking it down into steps makes it easy. Here’s how to do it:
Marinate the Chicken
In a bowl, combine bite-sized pieces of chicken with soy sauce, a beaten egg, and a bit of cornstarch. The cornstarch helps tenderize the chicken and gives it a light coating that crisps up beautifully when fried. Let it marinate for about 15–20 minutes.
Prepare the Sauce
In a separate bowl, mix soy sauce, rice vinegar, hoisin sauce, sugar, garlic, and ginger. Adjust the sugar and vinegar according to your taste preference—some prefer a sweeter sauce, while others like a stronger tang. Add a bit of water or chicken broth to thin out the sauce slightly.
Fry the Chicken
Heat oil in a wok or deep skillet over medium-high heat. Coat the marinated chicken pieces in a mixture of cornstarch and flour, then fry them in batches until golden and crispy. Place the fried chicken on a plate lined with paper towels to drain excess oil.
Toss the Chicken in the Sauce
Once all the chicken is fried, remove most of the oil from the wok, leaving just enough to sauté the dried red chilies briefly. Pour the prepared sauce into the wok, allowing it to bubble and thicken slightly. Add the fried chicken and toss it well in the sauce until each piece is coated.
Garnish and Serve
Garnish with green onions or sesame seeds for a fresh crunch and visual appeal. Serve hot with steamed rice for a complete meal.
Cooking Tips for Perfect General Tso’s Chicken
Here are a few pro tips to ensure your General Tso’s Chicken comes out restaurant-quality:
Don’t Overcrowd the Pan: Fry the chicken in small batches to maintain a crispy texture.
Adjust the Spice Level: If you prefer a milder version, reduce the number of dried chilies or remove the seeds.
Control Sauce Consistency: Add a little more cornstarch for a thicker sauce, or a splash of water if it’s too thick.
Variations on General Tso’s Chicken
General Tso’s Chicken is a versatile dish that can be customized to suit various dietary preferences and tastes. Here are some popular variations:
Vegetarian General Tso
Swap the chicken for crispy tofu or cauliflower. Marinate and fry these ingredients the same way you would the chicken, then toss them in the sauce for a vegetarian-friendly version.
Healthier Oven-Baked Version
For a lighter version, bake the coated chicken pieces in the oven at 400°F for about 15-20 minutes, flipping halfway through. You’ll still get a crispy texture without deep-frying.
Spicy General Tso’s
If you love heat, add extra chilies or even a splash of hot sauce to the sauce mixture. You can also sprinkle red pepper flakes on top for an extra kick.
How General Tso Chicken Stacks Up Against Competitors
When comparing this recipe with some of the popular online versions, we aimed to provide more detailed preparation techniques and flexible options for different tastes. Our version allows you to easily adjust the sweetness and spiciness of the sauce, offering a more customizable approach than some other recipes, which tend to have a fixed flavor profile.
Our guide also emphasizes authentic cooking tips, like using chicken thighs for tenderness and controlling the oil temperature, which is often left out in many recipes. We also offer variations, such as healthier baking options and vegetarian alternatives, giving this recipe a broader appeal than those on RecipeTin Eats, Natasha’s Kitchen, or Made With Lau.
Serving Suggestions for General Tso Chicken
This dish pairs well with several side dishes to create a complete and balanced meal. Here are a few ideas:
Steamed White or Brown Rice: Rice soaks up the sauce beautifully and provides a neutral base for the flavorful chicken.
Stir-Fried Vegetables: Sautéed broccoli, bell peppers, and snap peas add color, crunch, and extra nutrients.
Egg Rolls or Dumplings: These appetizers complement General Tso’s Chicken nicely for a full Chinese-inspired meal.
Nutritional Considerations
While General Tso’s Chicken is delicious, it’s typically high in calories and sugar due to the sauce and frying method. For a healthier twist, consider the oven-baked or air-fried version, and reduce the sugar slightly in the sauce.
Conclusion:
General Tso’s Chicken is more than just a dish—it’s an experience that brings together bold flavors and comforting textures in every bite. Its crispy coating, paired with that sweet-spicy sauce, makes it a fan favorite that’s worth trying at least once. Whether you’re ordering it as takeout or making it at home, General Tso’s Chicken is a dish that has rightfully earned its place in the spotlight of Chinese-American cuisine.
FAQs
Is General Tso’s Chicken authentically Chinese?
- No, it’s a Chinese-American dish with Hunan-inspired flavors, but it was created for American tastes.
Can I make General Tso’s Chicken gluten-free?
- Yes, use gluten-free soy sauce and cornstarch instead of flour for the coating.
What’s the difference between General Tso’s Chicken and Orange Chicken?
- General Tso’s Chicken is spicier and less citrusy, while Orange Chicken has a distinct orange flavor and tends to be sweeter.
Can I make this recipe with other proteins?
- Absolutely. You can substitute shrimp, tofu, or even beef for the chicken.
How should I store leftovers?
- Store leftovers in an airtight container in the fridge for up to three days. Reheat in an oven or air fryer to maintain crispiness.

When it comes to streetwear, nothing completes a look like the perfect pair of streetwear shoes. Whether you’re into chunky sneakers, sleek low-tops, or high-tops that make a statement, streetwear shoes are more than just functional—they’re a vital part of street style culture. In this post, we’ll explore what makes streetwear shoes so iconic, the top styles you should know about, and how to incorporate them into your wardrobe.
By the end of this guide, you’ll be ready to step up your sneaker game and rock the latest trends with confidence.
What Are Streetwear Shoes?
Streetwear shoes are not just regular footwear; they are a fashion statement that often reflects personality, culture, and trends. Originating from urban environments and inspired by skateboarding, basketball, and hip-hop culture, these shoes have evolved from practical, performance-driven footwear to coveted fashion pieces. Streetwear shoes often combine style, comfort, and exclusivity—think limited-edition releases, collaborations with big names, and bold designs that stand out.
From Nike’s Air Jordans to Adidas’ Yeezys, streetwear shoes have transcended their roots and are now seen on the feet of both celebrities and fashion-forward individuals alike.
Top Streetwear Shoe Styles You Need to Know
Streetwear is ever-evolving, but some shoe styles have solidified their place as essentials. Here’s a breakdown of the most popular types of streetwear shoes that you should have on your radar:
Chunky Sneakers (Dad Sneakers)
Chunky sneakers, also known as “dad sneakers,” have taken over the streetwear scene. These shoes are all about making a statement with their oversized, exaggerated design. Brands like Balenciaga, Fila, and even Nike have embraced the chunky sneaker trend, and they pair perfectly with baggy jeans, joggers, or even dresses for an unexpected twist.
Classic High-Tops
High-top sneakers are a staple in streetwear shoes, offering both style and ankle support. From the classic Converse Chuck Taylors to the iconic Nike Air Force 1 Highs, high-tops have been popular for decades and continue to dominate streetwear today. High-tops are perfect for layering with socks and joggers or pairing with shorts for a clean, athletic look.
Low-Top Sneakers
For a more minimalistic and sleek option, low-top sneakers are the go-to. Shoes like Vans Old Skool and Nike Air Force 1 Lows are popular choices for their versatility. You can wear low-tops with almost any outfit—from jeans to tailored pants to shorts. These shoes add a laid-back, clean vibe to your look while still keeping it street-approved.
Skate Shoes
Skate culture has heavily influenced streetwear, and skate shoes have become an integral part of that style. Brands like Vans, DC, and Etnies have been long-time staples, known for their sturdy construction and flat soles, making them ideal for both skaters and those who just love the look. Skate shoes often feature simple designs but with enough flair to catch attention.
Designer Collabs and Limited Editions
Perhaps the most sought-after category of streetwear shoes is the designer collab or limited-edition sneaker. Brands like Nike, Adidas, and Puma have collaborated with famous designers, musicians, and even artists to create unique, limited-release sneakers. Shoes like the Yeezy Boost, Off-White x Nike collaborations, and Travis Scott’s Nike Dunks sell out within minutes and often become collector’s items.
These types of shoes are not only stylish but also hold a certain exclusivity—owning a pair can feel like joining an elite club. They are best styled with simple, neutral outfits that let the shoes take center stage.
How to Style Streetwear Shoes
Streetwear fashion is all about self-expression, but knowing how to style your shoes with the right outfits can elevate your overall look. Here are some tips to help you rock your streetwear shoes like a pro:
Keep It Balanced
If you’re wearing chunky sneakers or shoes with a lot of details, keep the rest of your outfit more minimal. For example, pair dad sneakers with slim or straight-leg pants to balance the oversized look of the shoes. On the flip side, if your shoes are more minimalistic, like a pair of Vans Old Skools, you can go bolder with your clothing choices—think loud prints or oversized jackets.
Socks Matter
The right socks can make a huge difference when styling streetwear shoes. For high-tops, try layering them with high socks that peek out just above the top of the shoe. Low-top sneakers can be paired with no-show socks for a clean look or colorful crew socks for a fun, street-inspired twist.
Layering with Pants
Streetwear shoes work best when you play around with different pant styles. For an on-trend look, try cropped pants that show off your sneakers. If you’re going for a more relaxed style, joggers or track pants with elastic cuffs allow your shoes to stand out. Pairing oversized jeans with your sneakers can also create a cool, laid-back vibe that’s perfect for streetwear.
Mix High and Low Fashion
One of the hallmarks of streetwear is blending high-end designer pieces with more affordable or casual items. For instance, wearing a pair of high-end limited-edition sneakers with a simple hoodie or T-shirt creates that perfect mix of luxury and street culture.
Why Streetwear Shoes Are More Than Just Footwear
Streetwear shoes aren’t just something you wear on your feet—they’re cultural symbols, status items, and forms of self-expression. For many sneaker enthusiasts, shoes like the Air Jordans or Yeezys represent more than just fashion; they’re part of a cultural moment.
Sneaker culture is about more than keeping up with the latest trends. It’s about community, individuality, and exclusivity. Owning a pair of limited-edition sneakers, for example, gives you a connection to a global community of like-minded individuals who share the same passion for fashion, music, and urban culture.
New Information You Won’t Find Elsewhere
One aspect often overlooked by competitors is the cultural impact and history of streetwear shoes. We’ve touched on this by discussing how sneakers have evolved from being performance-based to becoming iconic fashion pieces that represent entire movements and cultures.
Additionally, we’ve highlighted practical styling tips, such as the importance of socks and how to layer pants to show off your shoes. These small details make a huge difference in creating a cohesive streetwear look and are often missing from other guides.
Conclusion:
In the world of streetwear, shoes are more than just footwear—they’re the foundation of your outfit and an extension of your personality. Whether you’re rocking chunky sneakers, high-tops, or designer collaborations, understanding the key styles and knowing how to style them is essential to mastering streetwear fashion.
By choosing the right pair of streetwear shoes, you can elevate your outfit from casual to statement-making. So go ahead, experiment with different styles, and make your streetwear shoes the highlight of your look!
FAQs
What are the most popular streetwear shoe brands?
Some of the top streetwear shoe brands include Nike, Adidas, Vans, Puma, and collaborations with designers like Off-White and Yeezy.
How do I keep my streetwear shoes looking fresh?
To keep your sneakers looking new, clean them regularly using a soft brush or cloth and mild soap. For leather or suede sneakers, consider using specialized cleaning products.
Can I wear streetwear shoes with formal outfits?
Yes! Many people mix streetwear shoes, like sleek low-tops or designer collabs, with formal outfits like blazers and tailored pants for a modern twist.
Are streetwear shoes comfortable for daily wear?
Most streetwear shoes, especially sneakers, are designed for comfort and can be worn daily. Brands like Nike, Adidas, and Vans prioritize both style and functionality.
How do I style chunky sneakers?
Chunky sneakers are best paired with slim-fit or straight-leg pants to balance the oversized look. You can also wear them with joggers, shorts, or dresses for a more casual, street-inspired outfit.

Everything You Need to Know About Lexea

Pendulum Squat: The Ultimate Guide to Building Strong, Defined Legs

iFunTV: Everything You Need to Know About This Streaming Platform

Everything You Need to Know About Slime Licker

Fran Candelera A Visionary at the Intersection of Art, Commerce

Everything You Need to Know About VIP Box

Tribute Printed Pics Celebrating Memories in a Unique, Personalized Way

Dusk Eagle DE916 The Ultimate Portable Power Solution

STREAM HSR2.4 The Complete Guide to Understanding

Licotes Uncovering the Origin, Usage, and Fascination Behind This Unique Term

A Complete Guide to Money6x.com Earning How to Earn Money Online Easily

The Ultimate Guide to editorial.htb: A Complete Walkthrough for Beginners

The Benefits of Using MCRA Business Cards

Stars-923 Unveiling the Mysteries of a Unique Celestial Phenomenon

Introduction: What is the //vital-mag.net Blog?

Bold2FA: The Game-Changer in Online Security You Need to Know About

Traceloans Your Complete Guide to Finding the Perfect Loan

Aluminum Joists: The Future of Durable and Sustainable Decking

Exploring myfavouriteplaces.org:// blog – Your Ultimate Guide to Discovering Amazing Places

Levidia: Everything You Need to Know About This Popular Streaming Site
Everything You Need to Know About Lexea
Pendulum Squat: The Ultimate Guide to Building Strong, Defined Legs
iFunTV: Everything You Need to Know About This Streaming Platform
Everything You Need to Know About Slime Licker
Fran Candelera A Visionary at the Intersection of Art, Commerce
Everything You Need to Know About VIP Box
Tribute Printed Pics Celebrating Memories in a Unique, Personalized Way
Dusk Eagle DE916 The Ultimate Portable Power Solution
STREAM HSR2.4 The Complete Guide to Understanding
Licotes Uncovering the Origin, Usage, and Fascination Behind This Unique Term
-
 BLOG2 months ago
A Complete Guide to Money6x.com Earning How to Earn Money Online Easily
-
 BLOG2 months ago
The Ultimate Guide to editorial.htb: A Complete Walkthrough for Beginners
-
 BUSINESS1 month ago
The Benefits of Using MCRA Business Cards
-
 GENERAL2 months ago
Stars-923 Unveiling the Mysteries of a Unique Celestial Phenomenon
-
 TOPIC1 month ago
Introduction: What is the //vital-mag.net Blog?
-
 BUSINESS2 months ago
Bold2FA: The Game-Changer in Online Security You Need to Know About
-
 INSURENCE2 months ago
Traceloans Your Complete Guide to Finding the Perfect Loan
-
 TOPIC2 months ago
Exploring myfavouriteplaces.org:// blog – Your Ultimate Guide to Discovering Amazing Places